Are you wondering How to Install Security Cameras or thinking of installing your own security cameras, and are not quite sure on how it comes together. Let’s take a look at the two types commonly used and the cabling options.
See our other blogs – Setting Up Bitvision Remote View, Night Vision, & Placement of security Cameras
Cabling IP Security Cameras
To Install IP Security Cameras, you will need to follow these steps:
First you will need to run the cable. Being IP you will use either Cat5e or Cat6 cable. Either one is fine and will deliver excellent results. Please note that not all cables are the same, so please do not use pre-made cables or cheap cable. Cat5e and Cat6 will fail over time if you select a cheap cable, whereas quality cable will last you longer then the warranty period.
You also have to be very careful not to twist or pull the cable too tight, or have sharp bends in the cable. Doing this will damage the cable and cause years of unreliability.
It is important to note that as IP security camera systems run on a network, not all cameras need to connect to a recorder. As long as they are all plugged into the same network, the NVR should pick them up. When we do complex installations we will often run a few PoE switches and network them back to the recorder. This allows you to plug all cameras at one end of the building into a PoE switch, and then run a single cable back to the recorder.
In many buildings you may have a WIFI and cabled network. These are often separate networks, so you need to keep your cameras on the same network as the NVR. You can also add wireless bridges between any sections that are a single cable allowing you to wireless span between buildings.
IP Security Cameras Schematic
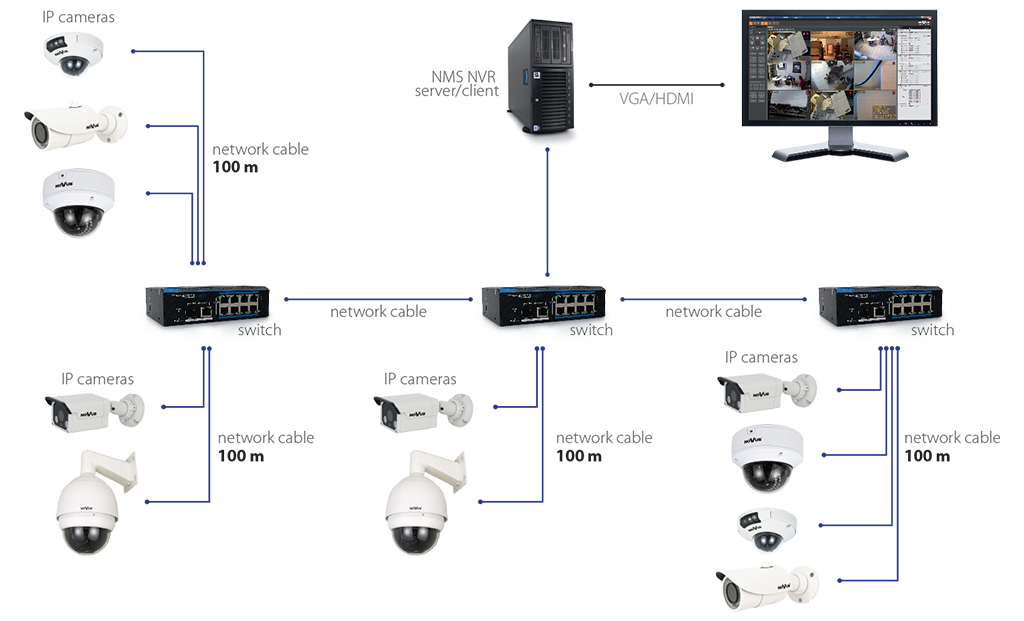
Once you have your cable run, the rest is fairly easy. Firstly, ensure you have installed the HDD into the NVR.
You will then need to run a HMDI or VGA cable from the NVR to your monitor. Remember your monitor can only display it’s max resolution, so if you have a normal PC screen @2mp, you will need to set your NVR display to match it. Don’t worry though, if your cameras are 4K, they will still record at that resolution.
Next job is it plug the NVR into the modem. If this isn’t possible, a WIFI bridge will help. This will allow you to setup P2P remote view.
Now it’s time to set up the recorder. All models are different, from the complicated GUI of Hikvision, to Dahua and the simple OzSpy interface. Please see manual of the recorder to set up the cameras.
Cabling HD TVI, AHD, CVI Security Cameras
There are a few main differences between these coax systems and IP systems. The first difference is the cable. TVI, CVI & AHD use coax as the preferred cable. You can use Cat5e, however you will need Baluns at each end of each cable and you may lose some picture quality.
We generally use combo cable which has the power cables connected to the coax. This saves running additional cables. Please note that if you are trying to use existing DIY cables, they may not be compatible as many can only handle 2mp or under.
The next main difference is that each cable from each camera goes directly to the DVR/XVR. This means you cannot add wireless bridges or switches to reduce cabling.
TVI Analogue Security Cameras Schematic
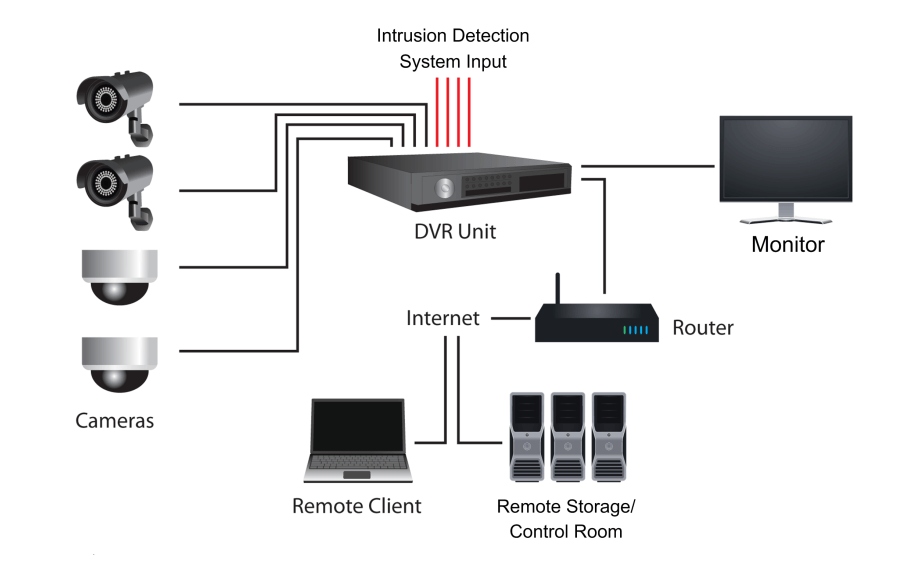
Once you have your cable run, the rest is fairly easy. Firstly, ensure you have installed the HDD into the DVR/XVR.
You will then need to run a HMDI or VGA cable from the DVR/XVR to your monitor. Remember your monitor can only display it’s max resolution, so if you have a normal PC screen @2mp, you will need to set your DVR/XVR display to match it. Don’t worry though, if your cameras are 4K, they will still record at that resolution.
Next job is it plug the DVR/XVR into the modem. If this isn’t possible, a WIFI bridge will help. This will allow you to setup P2P remote view.
Now it’s time to set up the recorder. All models are different, from the complicated GUI of Hikvision, to Dahua and the simple OzSpy interface. Please see manual of the recorder to set up the cameras.
We hope you have enjoyed our article on How to Install Security Cameras